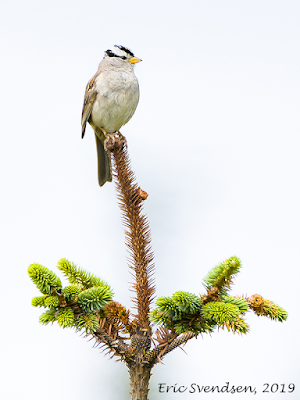
White crowned sparrows – compensating for back lighting.
 |
| White-crowned sparrow on a favourite perch. |
The white-crowned sparrow is a common summertime visitor to Western and much of Northern Canada. I hear its familiar chirping and see its telltale black and white striped crown on many of my travels. I spotted this one yesterday near the beach in southeast Washington. They feed on the ground, taking both seeds and insects. It is amazing to watch them moving leaf litter; with both feet planted on the offending target, they hurl it backward with a synchronized jerk, unlodging any morsels hiding underneath.
They are not terribly shy. I often find them perching atop tall plants or trees surveying their kingdom. Photographing them in this position is often problematic because of backlighting. Backlighting happens when the background is brighter than the light coming off the subject. This causes the camera to underexpose the image, leading to a flat, gray background with a dark foreground. The solution is to compensate for this. There are three quick methods.
1) Use exposure compensation. The +/- button is your exposure compensation button. Most cameras will have access to this feature either directly through a button, or indirectly through a menu option. When pressing the button and holding onto it, you can add to or subtract from an exposure by rotating the command dial at the same time. Some cameras may allow you to press and release the exposure compensation button and then change the setting, then press it again to go back into shooting mode. The challenge is twofold; first, you have to estimate how much you want to compensate the exposure by. I find many backlit situations benefit from a +1 setting, although I have gone past +2 on some occasions. The other issue is forgetting to turn it off after using it.
2) Use exposure lock. This handy little feature is often found as a button with EL or FL written on it, allowing you to lock your exposure at a predetermined value. In the case of the sparrow above, lowering the camera so there is little backlighting and holding the button will lock the exposure in. Reframing you then take the picture. This has the advantage of not having to estimate what value to use, and it turns off automatically. This sounds marvellously magical, but the issue is finding an area with lighting similar to the one your subject is in. This can be a bit of a hunt-and-find methodology. I pay attention to my viewfinder exposure settings when using this and keep in mind how much extra exposure I need. If you are not familiar with shutter and aperture values, this makes finding the right balance more difficult.
3) Using manual exposure mode. Most people are uncomfortable with manual exposure mode. In fact, many will set their cameras to full auto or intelligent auto and leave it there. Although intimidating, manual mode will unlock the potential of your camera if you know how to use it. There is a steep learning curve, as some knowledge of aperture and shutter speed settings is mandatory, and you have to be comfortable working with changing both those settings manually. I photographed the white crown sparrow above in manual mode. The light of the day was unvarying; this meant that I could use the same exposure settings for all my shots unless something changed significantly. With the flat grey cloud cover, the exposures were consistent. Also, I use RAW files instead of jpegs, which means I have extra latitude for correction if the exposure is off. Together they allow me to capture my images with relatively few corrections.
Thanks for reading.
Eric Svendsen www.ericspix.com


Comments
Post a Comment