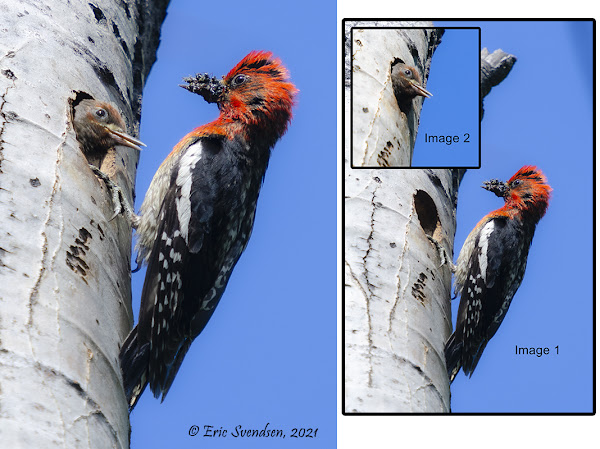
Producing a composite image.
I enjoy producing composite images. To clarify, a composite is an image where two or more shots are combined together to appear as one, natural picture. The great problems with composites are compatibility between components, relative scale, angle, and position of components, and an effective blending together of those components.
I usually do composites with only two images. This often involves a background and a foreground. Green-screening is an example of this and is commonly done in cinematic productions. You can see an interesting composite I did by clicking here. The composite I produced today was a little more natural. I had photos of the parent and chick separately, but not together. I decided it would make a more interesting composition to combine the two. The process took about an hour. These are the steps I took:
Thanks for reading. Ericspix Eric Svendsen
I usually do composites with only two images. This often involves a background and a foreground. Green-screening is an example of this and is commonly done in cinematic productions. You can see an interesting composite I did by clicking here. The composite I produced today was a little more natural. I had photos of the parent and chick separately, but not together. I decided it would make a more interesting composition to combine the two. The process took about an hour. These are the steps I took:
- Take the Raw image of the parent (Image 1 above) and open it in Photoshop Raw.
- Manipulate image using the various Photoshop controls to produce the desired quality.
- Transfer the image to Photoshop CC.
- Take the image of the chick (Image 2 above) anopen it in Photoshop Raw.
- Copy previous adjustments to this image and transfer it to Photoshop CC.
- Select the chick and hole using the Selection Tool.
- Copy the selection Open the first image and paste the chick image onto it.
- Chose the Move Tool and make sure the chick layer is the active one.
- Rotate the image to line up the two holes (done by hiding pasted layer and checking, showing layer and repeating until images are lined up).
- Chose the eraser tool. Erase extraneous materials. For this I had to play a lot with the size and hardness values of the tool. This took most of the time. I had to make sure the two images would blend together well.
- Flatten composite to produce a final image.
- Crop image down to desired image. Resize and save.
Thanks for reading. Ericspix Eric Svendsen


Comments
Post a Comment